Monday, August 10, 2020

Hosting a static website on Oracle Object Storage

We can use Oracle cloud Object Storage to host a static website. Static web pages can contain client-side technologies such as HTML, CSS, and JavaScript. They cannot contain dynamic content such as server-side scripts like PHP, JSP or ASP.NET.

Step 1:

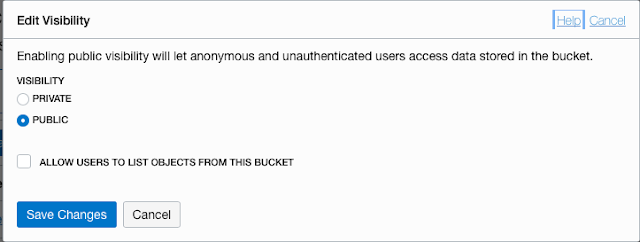
We need to create a public bucket and upload the static website contents. Once the bucket is created edit the visibility to give public access.  


Step 2:

Upload the files, here is the trick. Object storage doesn't support the hierarchy of folder structure. So we have to name each file based on its path.
For example, we have a index.html that has a link to the file page-1.html inside the pages folder.
We have to upload index.html as index.html and page-1.html as "pages/page-1.html". So that links will work.
 
I know this can be tedious since a website contains hundreds of html files, images, css and javascript. So I have automated this process. 

Upload Tool

It can be cloned by git or download as a zip (https://github.com/pallabrath/myexpjava) and then unzip

1. Move to the oci-os-static-web-upload-util directory.
2. To run the script we need node and npm to be installed in our environment.
3. Required inputs for this tool need to be configured in upload-config.json.
{
    "webdir" : "/Users/pallab/mylab/oci-os-static-web",   # This is the path of the static web need to be uploaded
    "index" : "index.html",                               # Its the index/home page of your website 
    "configurationFilePath" : "~/.oci/config",            # OCI credential configuration
    "configProfile" : "DEFAULT",                          # OCI credentail config profile 
    "comaprtmentOCId" : "ocid1.compartment.oc1......",    # OCI compartment OCID where we want to upload
    "bucketName" : "myexpdemo"                            # bucket name to be created
 } 

Example :

[DEFAULT]
user=ocid1.user.oc1..<your_unique_id>
fingerprint=<your_fingerprint>
key_file=~/.oci/oci_api_key.pem
tenancy=ocid1.tenancy.oc1..<your_unique_id>
customCompartmentId=ocid1.compartment.oc1..<your_unique_id>
How to create OCI API signing key


4. Once the credentials are set and inputs are provided in upload-config.json. We are all set to run the util.


This will create a bucket with visibility public and publicAccessType = ObjectReadWithoutList.
It will upload all the files in the user-selected folder (mentioned as webdir in upload-config.json) to the bucket. 
The util will print the url of the index file. This will be the website homepage url.

Custom Domain

We can configure this as a http redirect or url forwarding to use the custom domain. 


Sunday, May 10, 2020

Run a Spring Boot application on OCI Compute Instance

In this article, we will see how to deploy a spring boot application in Oracle cloud compute instance.

Creating a new Spring Boot app and running it locally


We will create a spring boot app and test locally. 
start.spring.io can be used to start. Or there is a sample Hello World project I have created can be referred https://github.com/pallabrath/myexpjava/tree/master/spring-boot/spring-web-rest-demo

package myexpjava.demo; import org.springframework.stereotype.Controller; import org.springframework.web.bind.annotation.GetMapping; import org.springframework.web.bind.annotation.ResponseBody; @Controllerpublic class DemoController { @GetMapping("/hello") @ResponseBody public String sayHello() { return "Hello World !!!"; } } ./gradlew bootRun This command will run the application and we can test the same in any browser in the url http://localhost:8080/hello/ It should print Hello World !!! in browser

Creating an OCI compute instance and deploy the app.


We will try to deploy this app directly to a single OCI compute instance and we will run it. 
For this example, we have used the standard Oracle-Linux-7.8 image.
To create a compute instance in OCI console, we need to navigate compute and create instance. To access the instance we need ssh keys, to genarte the same please refer https://docs.cloud.oracle.com/en-us/iaas/Content/Compute/Tasks/managingkeypairs.htm 

Once the compute is ready. We need to install Java, as our Spring Boot App requires a java environment to run.
1. ssh to compute instance
ssh -i ~/.ssh/oci_compute opc@<public ip> of the compute instance>
2. Install java in the compute instance, for this example jre is enough.
sudo yum install jre-12.x86_64
3. Configure the firewall to open port 8080, as our app will run in 8080
sudo firewall-cmd --zone=public --permanent --add-port=8080/tcp
sudo firewall-cmd --reload
Make a directory where we will copy our spring app
mkdir spring-app/


4. Network configuration to allow Internet traffic to our compute instance.
     a) We need an internet gateway configured in the VCN where the compute instance belongs
     b) Route table entry to allow the traffic through the internet gateway

    c) Security Ingress rule needs to be added to allow traffic. 


5. Copy our Spring Boot app from laptop to compute instance and run.
./gradlew clean build This will build and create the spring-web-rest-demo-1.0.jar in ./build/libs
To copy the same to our compute instance
scp -i ~/.ssh/oci_compute build/libs/spring-web-rest-demo-1.0.jar opc@<public ip>:spring-app/
Now ssh to the compute and run the app
ssh -i ~/.ssh/oci_compute opc@<public ip> of the compute instance>
java -jar spring-app/spring-web-rest-demo-1.0.jar

Our spring app should run in port 8080. If all the configs are correct 
we should able to see Hello World !!! in the browser, by trying compute's 
http://<public ip>:8080/hello
If you don't see please revisit step 3 and 4   

Wednesday, February 12, 2020

Connecting Google cloud SQL from App engine.

Google cloud platform support PHP application in its app engine. App Engine is an elastic container it automatically scales up and down based on the traffic.

Here is the https://cloud.google.com/appengine/docs/standard/php7/quickstart explaining how to deploy PHP application into GCP app.

The scope of this article is how to connect to the cloud sql in your PHP from app engine. To deploy into app engine we need to configure some meta information in app.yaml
If we are connecting by dsn we don't need any special configuration. we can refer to the database directly like
mysql:unix_socket=/cloudsql/<MY-PROJECT>:<INSTANCE-REGION>:<MY-DATABASE>;dbname=<my_db>

I am assuming both your app engine and cloud database in the same project. Else we have to explicitly give access.

$dbdsn = "mysql:unix_socket=/cloudsql/<MY-PROJECT>:<INSTANCE-REGION>:<MY-DATABASE>;dbname=<my_db>";
$conn = new PDO($dbdsn, $username, $password);

We can add the dsn in app.yaml read as an environment variable.

In app.yaml

env_variables:
  DB_DSN: mysql:unix_socket=/cloudsql/<MY-PROJECT>:<INSTANCE-REGION>:<MY-DATABASE>;dbname=<my_db>
DB_USER: my-db-user
DB_PASS: my-db-pass
DB_NAME: my_db 
DB_SERVER: my_server

And in the code

$dbdsn = getenv('DB_DSN');
$username = getenv('DB_USER');
$password = getenv('DB_PASS');

$conn = new PDO($dbdsn, $username, $password);

If we want to do tcp connection by providing host and port

$conn = new mysqli($servername, $username, $password, $dbname);

Then app.yaml we have to add 

beta_settings:
  cloud_sql_instances: <INSTANCE_CONNECTION_NAME>=tcp:<PORT>

And in the code $servername= 172.17.0.1:<PORT>;