Wednesday, January 12, 2022

How to connect Java a program to Oracle Autonomous Database over TLS without wallet

In this blog post, we will discuss how to connect Java a program using JDBC thin driver to Oracle Autonomous Database over TLS without a wallet.

With TLS support we can now connect to ADB without the credential wallet.

Part 1: We need to configure ADB for TLS to get the TLS connection string.

a) For the ADB we want to connect over TLS, In the Autonomous database details page, we need to set Mutual TLS authentication (mTLS) as not required. 


b) Then from the database connection page (we can navigate to it by clicking on DB connection button in the ADB console) chose "TLS" as TLS authentication and copy the connection string for desired TNS name. In this example, I had copied demodb_medium


Part 2: Java program which uses the above connect string in jdbc to execute sql statements.

Prereq : ojdbc8.jar and ucp.jar

I have used JDK 11 in this eample

package demo;

import java.sql.*;
import java.util.Properties;

public class ADBSharedTLSConnect {
private static String atps_tls = "(description= (retry_count=20)(retry_delay=3)(address=(protocol=tcps)(port=1521)(host=adb.ap-mumbai-1.oraclecloud.com))(connect_data=(service_name=rks9000p5ge4_demodb_medium.adb.oraclecloud.com))(security=(ssl_server_dn_match=yes)(ssl_server_cert_dn=\"CN=adb.ap-mumbai-1.oraclecloud.com, OU=Oracle ADB INDIA, O=Oracle Corporation, L=Redwood City, ST=California, C=US\")))";
private static String db_url = "jdbc:oracle:thin:@" + atps_tls;
private static String dbUser = "admin";
private static String dbPwd = "test@ATP122245";

public static void main(String[] args) {
System.out.println("Connecting to ATPS over TLS...");
ResultSet rs = null;
Statement stmt = null;
Connection con = null;
try {
Class.forName("oracle.jdbc.driver.OracleDriver");
Properties props = new Properties();
props.setProperty("user", dbUser);
props.setProperty("password", dbPwd);
props.setProperty("oracle.jdbc.fanEnabled", "false");
con = DriverManager.getConnection(db_url, props);
stmt = con.createStatement();
rs = stmt.executeQuery("select sysdate from dual");
while (rs.next()) {
System.out.println(rs.getString(1));
}
System.out.println("Demo Over...");

} catch (Exception e) {
System.out.println(e);
} finally {
try {
if (rs != null) {
rs.close();
}
if (stmt != null) {
stmt.close();
}
if (con != null) {
con.close();
}
} catch (SQLException e) {
e.printStackTrace();
}
}
}
}

atps_tls is the one that I had copied from part 1 step b.

I have used oracle.jdbc.fanEnabled property as false, without this configuration there was an error 

SEVERE: attempt to configure ONS in FanManager failed with oracle.ons.NoServersAvailable: Subscription time out

Although query was getting executed.

Some useful links

1. JDBC connection without wallet

2. Update your Autonomous Database Instance to Allow both TLS and mTLS Authentication

3. View TNS Names and Connection Strings for an Autonomous Database Instance

4. Source Code in git

Monday, July 19, 2021

How to Connect a Go program to Oracle Autonomous Database

In this blog post, we will see how to connect Oracle Autonomous Database in Go programming language. This can be divided into three parts.

Part 1) We need to download Autonomous Database client credentials.  More details

In the Autonomous database OCI console, open to the service console of the DB which we need to connect. There in the Administration tab, we will find the option to download the client credentials.


 Once It is downloaded, unzip the same to a directory of choice.

Part 2) To connect to the database we need the database user, password, and the connect string.

We can use the admin user, which was provided as part of the database provision, or any other database user. Here we need to form the connect string.

example: protocol://host:port/service_name?wallet_location=/my/dir&retry_count=3&retry_delay=20

We need to form our connect string for the autonomous database we want to connect. We will get details in the tnsnames.ora file which is part of the zip we had downloaded in above Part 1.

There we will find many connection services (more details about them), We can pick the one we want to use for our connection.

example: 

db202107181649_medium = (description= (retry_count=20)(retry_delay=3)(address=(protocol=tcps)(port=1522)(host=adb.ap-mumbai-1.oraclecloud.com))(connect_data=(service_name=iro8q5fzknp5ge4_db202107181649_medium.adb.oraclecloud.com))(security=(ssl_server_cert_dn="CN=adb.ap-mumbai-1.oraclecloud.com, OU=Oracle ADB INDIA, O=Oracle Corporation, L=Redwood City, ST=California, C=US")))

Now by referring to this we can create our connection string like below.

tcps://adb.ap-mumbai-1.oraclecloud.com:1522/iro8q5fzknp5ge4_db202107181649_medium.adb.oraclecloud.com?wallet_location=/Users/pallab/tool/wallet_DB/

The wallet_location is the path where we had unzipped our client credentials in above Part 1.

Part 3) Now let's write our go code.

We will use godror package to connect. 

Install godor # go get github.com/godror/godror

We need runtime dependency for Oracle Client libraries, We can download the free basic or free light version from https://www.oracle.com/database/technologies/instant-client/downloads.html.

package main

import (
"database/sql"
"fmt"

_ "github.com/godror/godror"
)

func main() {
connectToADb()
}

func connectToADb() {
fmt.Println("Connecting to Oracle Autonoumus database !!!")
db, err := sql.Open("godror", `user="admin" password="testPwd"
connectString="tcps://adb.ap-mumbai-1.oraclecloud.com:1522/iro8q5fzknp5ge4_db202107181649_medium.adb.oraclecloud.com?wallet_location=/Users/pallab/tool/wallet_DB/"
libDir="/Users/pallab/tool/instantclient_19_8/"`)
if err != nil {
fmt.Println(err)
return
}
defer db.Close()

rows, err := db.Query("select 'hello' from dual")
if err != nil {
fmt.Println("Error running query")
fmt.Println(err)
return
}
defer rows.Close()

var resData string
for rows.Next() {

rows.Scan(&resData)
}
fmt.Printf("The response is: %s\n", resData)
}

Note: In sql.open() we have passed our oracle client libraries which we downloaded and unzipped as libDir  parameter.

Useful Links

1. https://blogs.oracle.com/opal/how-connect-to-oracle-autonomous-cloud-databases

2. https://blogs.oracle.com/developers/how-to-connect-a-go-program-to-oracle-database-using-goracle

3. https://godror.github.io/godror/doc/installation.html


Monday, August 10, 2020

Hosting a static website on Oracle Object Storage

We can use Oracle cloud Object Storage to host a static website. Static web pages can contain client-side technologies such as HTML, CSS, and JavaScript. They cannot contain dynamic content such as server-side scripts like PHP, JSP or ASP.NET.

Step 1:

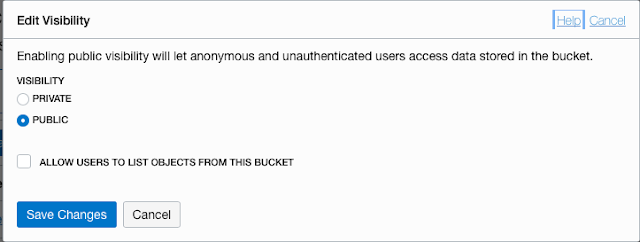
We need to create a public bucket and upload the static website contents. Once the bucket is created edit the visibility to give public access.  


Step 2:

Upload the files, here is the trick. Object storage doesn't support the hierarchy of folder structure. So we have to name each file based on its path.
For example, we have a index.html that has a link to the file page-1.html inside the pages folder.
We have to upload index.html as index.html and page-1.html as "pages/page-1.html". So that links will work.
 
I know this can be tedious since a website contains hundreds of html files, images, css and javascript. So I have automated this process. 

Upload Tool

It can be cloned by git or download as a zip (https://github.com/pallabrath/myexpjava) and then unzip

1. Move to the oci-os-static-web-upload-util directory.
2. To run the script we need node and npm to be installed in our environment.
3. Required inputs for this tool need to be configured in upload-config.json.
{
    "webdir" : "/Users/pallab/mylab/oci-os-static-web",   # This is the path of the static web need to be uploaded
    "index" : "index.html",                               # Its the index/home page of your website 
    "configurationFilePath" : "~/.oci/config",            # OCI credential configuration
    "configProfile" : "DEFAULT",                          # OCI credentail config profile 
    "comaprtmentOCId" : "ocid1.compartment.oc1......",    # OCI compartment OCID where we want to upload
    "bucketName" : "myexpdemo"                            # bucket name to be created
 } 

Example :

[DEFAULT]
user=ocid1.user.oc1..<your_unique_id>
fingerprint=<your_fingerprint>
key_file=~/.oci/oci_api_key.pem
tenancy=ocid1.tenancy.oc1..<your_unique_id>
customCompartmentId=ocid1.compartment.oc1..<your_unique_id>
How to create OCI API signing key


4. Once the credentials are set and inputs are provided in upload-config.json. We are all set to run the util.


This will create a bucket with visibility public and publicAccessType = ObjectReadWithoutList.
It will upload all the files in the user-selected folder (mentioned as webdir in upload-config.json) to the bucket. 
The util will print the url of the index file. This will be the website homepage url.

Custom Domain

We can configure this as a http redirect or url forwarding to use the custom domain.